
Building Your Dreams - A Concise Guide to Photography App Development
In a recent interview, we read that Elon Musk made a passing comment about photo apps, imploring enterprising individuals out there to spend some time thinking about lithium instead of what we all know and love – photography.
“Like, instead of making a picture-sharing app, please refine lithium. Mining and refining, heavy industry, come on,” said Musk.
Mr Musk’s statement must have been spurred on by the figures relating to the global photo editing software market, which was valued at USD 826.5 million in 2020, and is expected to grow at a compound annual growth rate (CAGR) of 6.6% until 2027!
While we’re definitely not saying that writing apps for lithium mining isn’t something that people should be focusing their energy and talent on, the connection between the two is a little tenuous, perhaps. However, Mr Musk’s statement sparked a little debate among some of the resident photo wafflers, bringing into focus the issue of exactly what it takes for someone to create a photographic app in today’s competitive environment and the potentially lucrative business this could bring to its creators.
Today, there are many different photo editing apps available, ranging from free variants to paid apps with advanced features. The amount of money invested into each app can vary widely depending on factors such as development costs, marketing expenses, and revenue generated.
Not only is it a highly competitive segment of the app market, it has also gone from strength to strength. As mentioned earlier, the historical data shows that since 2017, revenue has kept increasing with each successive year, and will, barring some kind of seismic shift in global tastes, continue to do so for some time coming.
We’ve all had those moments of inspiration, that enterprising spark that comes from time to time, perhaps whilst showering, that can bring about huge rewards if properly acted upon. While there are numerous challenges involved in creating a photography app, or any app for that matter, with the appropriate tools and know-how, this pipe dream can very well become a reality.
And to that end, we’ve scratched our collective heads, putting together a simple-to-understand overview and guide of the necessary steps needed to help bring your ideas to fruition.
BUILDING YOUR APP - A STEP-BY-STEP GUIDE
Step 1: Identifying Goals and Objectives
Step 2: Researching the Market
Step 3: Designing the User Interface
Step 4: Choosing the Right Platform and Tools
Step 5: Developing and Testing
Step 6: Launching and Promoting Your App
Step 1: Identify Your Goals and Objectives
Before you begin developing your photography app, it’s essential to identify your goals and objectives. What is this app all about? What do you want it to achieve, and how is it different from what is already out there? This is a crucial step that involves defining the features and functionality you want your app to have, as well as the target audience you are designing the app for. Once you’ve identified your goals and objectives, you can start planning the technical requirements to build the app.
Step 2: Research the Market
The next step is to research the market and identify any gaps or opportunities in the market that you can capitalise on. Researching the market will help you understand the competition and what features are currently available. This step is important to help you determine what your app needs to be competitive and differentiate from the existing apps. As most photographers are aware, a number of “camera apps”, including those that are integrated into your phone, often don’t have a full range of adjustable parameters required for those slightly more serious photographers. This might be precisely the kind of functionality you wish to implement in your app and bring it to the masses.
Step 3: Design the User Interface
Designing the user interface (UI) of your app is a critical step in creating a successful photography app. The UI should be intuitive, user-friendly, and visually appealing. This is essential to ensure that users can easily navigate the app’s features and functions.
To create an effective UI for your photography app, you should first identify your target audience and their specific needs. For example, when it comes to professional photographers, you want to include more advanced editing features (as previously discussed), while if your audience is casual smartphone users, you may want to focus on simplicity and ease of use.
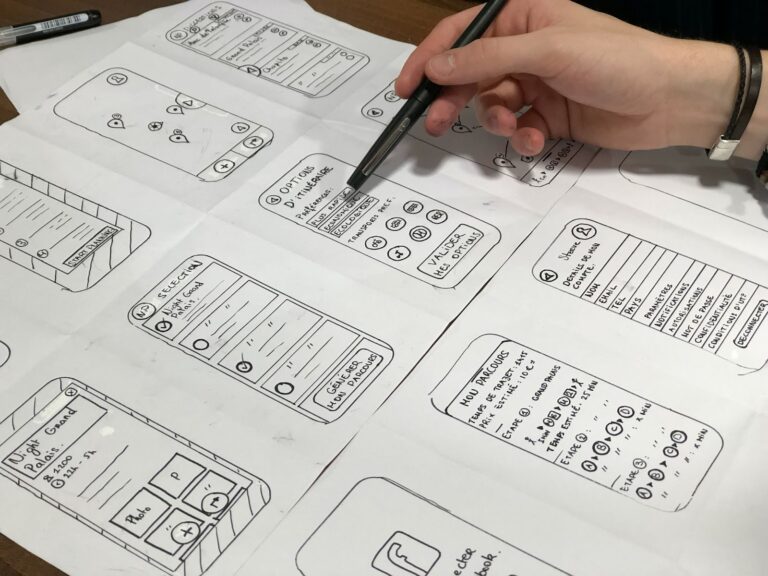
Once you have identified your target audience, you can begin to create wireframes and mockups of the app’s interface. Wireframes are simple, low-fidelity sketches that outline the basic layout and structure of the app’s interface. Mockups, on the other hand, are high-fidelity designs that show the visual appearance of the app’s interface.
Creating wireframes and mockups allows you to test the user experience and gather feedback from potential users before moving on to the development stage. This helps you identify any potential usability issues or design flaws and make adjustments before it’s too late.
Step 4: Choose the Right Platform and Tools
Choosing the right platform and tools is critical to building a successful photography app. There are two primary platforms for mobile app development, iOS, and Android. By extension, the platform you choose will impact the tools and programming languages used to build the app.
For iOS app development, you can use Xcode, which is Apple’s integrated development environment (IDE). Xcode uses the Swift programming language, which is a high-performance language designed to work seamlessly with Apple’s frameworks and APIs.
For Android app development, you can use Android Studio, which is the official IDE used by Google. Unlike Apple, Android Studio uses Java or Kotlin programming language, and it comes with a suite of tools and features to help you design and build high-quality products. While both platforms have robust development environments and programming languages, the development process for each can differ significantly.
When it comes to building a photography app for mobile devices, choosing the right platform and tools is crucial. As mentioned earlier, there are two primary platforms to choose from: iOS and Android. Each platform has its strengths and weaknesses, so it’s important to consider which one will be the best fit for your app.
While both operating systems have large user bases, they differ in terms of demographics and user behaviour. For example, iOS users tend to be more affluent and spend more money on apps than Android users. Android users, on the other hand, are more diverse in terms of geographic location and device types.
Between these two eco-systems, iOS development is typically considered to be more streamlined and consistent, as there are fewer device types and operating system versions to account for. Android development, on the other hand, can be more complex due to the sheer variety of devices and operating system versions that exist.
Step 5: Develop and Test Your App
The testing stage is particularly crucial in ensuring that the app is functioning as intended before releasing it to the public. The development stage involves not only writing the code for the app’s features and functionality but also working with a team of designers and testers to ensure that the app is user-friendly and visually appealing.
It’s essential to test the app on various devices to ensure compatibility with different screen sizes and operating systems. Doing so will help to identify any bugs or issues that may arise, allowing you to troubleshoot and fix them before the app is released to the general public.
During this stage, you’ll gain valuable insights into how the app functions and how users interact with it. You can use this information to improve the app’s features and user experience, making sure it’s as smooth and intuitive as possible. It’s crucial to fix any bugs or issues that arise during testing to ensure a seamless user experience and prevent users from encountering frustrating or confusing issues after launch.
Step 6: Launch Your App and Promote It
Once you’ve ironed out the teething issues, the final step in your photo app creation is to launch it on the respective app platforms and start promoting it. After launching your app, you’ll need to monitor user feedback and reviews and make any necessary updates or improvements based on this feedback.
As is the case with just about any product promotion, you can use various digital marketing channels such as social media, email marketing, influencer marketing, and search engine optimization (SEO) to aid in increasing its exposure.
Social media platforms like Facebook, Instagram, TikTok and Twitter are great ways to generate buzz and build a community around your app. TikTok, specifically, has proven to be a powerful platform for promotional exposure, especially when looking at possible partnerships and marketing through influencer accounts and similarly popular individuals.
Exposure via TikTok also opens up your app to a younger demographic, which can be just as lucrative, depending on the target audience, of course. However, even an app promoted on one platform, often ends up being shared across multiple social networks, as is the case with Instagram (where users often share content from TikTok or elsewhere).
As is the case with most good ideas, they tend to have a habit of proliferating. However, ideas without action, as the saying goes, are worthless. The same is true for applications, photographic or otherwise.
If you’ve been sitting on that awesome photo app idea for a while, but were unsure of where to begin with the implementation of the same, this guide is here to steer you in the right direction. There’s no time like the present, so roll up your sleeves and make it happen!